
Before we make the EPS cutter
This article is made because people asked for it: my previous writing was about heat insulating of the concrete floor, and there was my homemade electric polystyrene (EPS) insulation board cutter. This is a DIY erected thing, which with you can cut polystyrene based insulation. People got curious about this tormentor machine, and asked for a review on every forum.
So I kneel before the common will, and show you the gadget, so you can make yourself one. I can see with my inward eyes that everyone makes one for the family. So the stock market of insulation cutters begins to fall, and the factories need to change the production lines to electric fly killer tennis-rackets. I will get drunk of the success, and will call myself the Hungarian Elon Musk. Ok, this is a bit over the line, I will return to the topic.
Why is it good for us to have a insulation cutter?

The main thing is clean, precise EPS cutting. Traditionally, EPS and XPS is cut by saw, with heaps of dirt and inaccuracy. Cutting with a saw makes millions of small EPS grain, and these particles spread over the countryside. EPS and XPS grain will be in the ground, the neighbors garden and in all of our body openings (goes beside the thong as well). This machine cuts polystyrene beautifully, on factory levels, at quadrant angle, with low levels of scrap. The spoilage can be reused better, and doesn’t fall to small pieces easily. The main drawback is a little smoke around the wire, because of the melting material. Try not to inhale it too deeply, it’s unhealthy for sure. Try to use the cutter in a well ventilated area.
How does the EPS cutter work?
For cutting EPS or XPS insulation, the machine uses a heated metal wire. This hot wire melts and cuts the insulation. As We pull the hot wire through the insulation sheet, it melts and cuts the Styrofoam. This way we will be able to cut clearly straight line, with no loose EPS grain. With the cutter turned on, the adapter keeps the wire evenly hot. It works like an electric insulation guillotine.
To be clear, It’s not me, who invented this technology. There are many types of stock machines (and better DIY cutters as well) for sale. The big insulation factories are using the same concept to slice the XPS and EPS thermal insulation, in bigger scale of course.
EPS cutter ingredients
- 4 m (13 ft) polished wood slat 30 mm x 20 mm (1,18″ x 0,79″) – 3 $
- 1 pc. laminated board 130 cm x 35 cm (51,18″ x 13,8″)
- 2 pc. laminated board 35 cm x 10 cm (13,78″ x 3,94″)
- 2 pc. laminated board 35 cm x 15 cm (13,78″ x 5,9″) – all laminated boards 10 $ with cost of cutting
- universal notebook charger adapter (mine is an SP-2N1/90-100 type) – 12 $
- 1 pc. universal DC connector (female) – 1 $
- stock polystyrene cutting wire (long type) – 7 $
- 1 pair of roller slide with ball bearing 300 mm (11,8″) – 4 $/pair
- 4 m (13 ft.) PVC coated copper wire – 1$
- 1 small piece of piano hinge – 3 $
- wood screws – 1 $
- 2 pc. small ring bolt, with wingnut and washer – 0,5 $
- 1 pc. pusher sping – 1 $
- 1 pc. extension cord with on/off button – 5$
- impact wrench – there has to be one at home 🙂 If not, steal one from your parents
- screw sinker – 5 $
- tape measure – one has to be around
- saw, jig saw, buzz saw, any kind of saw – I believe this has to be at home as well.
You can buy all this sh*t at your local hardware mall. Maybe not the notebook adapter charger, you can buy that online. The cost for this altogether is under 70 $, so it’s pretty cheap. Stock basic polystyrene cutters cost about 340 $. The professional ones start from 500 $. I had a professional one as well, it worked perfectly.
Let’s put the EPS cutter together!
Start with the work desk!
The main base is the biggest laminated board. Don’t bother with wrapping the side of the boards, it’s useless here. you can have the boards cut to exact pieces at a board cutting service shop. Or you can dismount the kitchen furniture, and use the boards from it (wife will cut off your hose).
Make two legs by screwing the 35 cm x 10 cm (13,78″ x 3,94″) pieces on the short sides of the big 130 cm x 35 cm (51,18″ x 13,8″) board. When screwing, always center punch and the material, and sink the screws. It’s good because: the EPS insulation boards will lay perfectly on the surface of the desk.
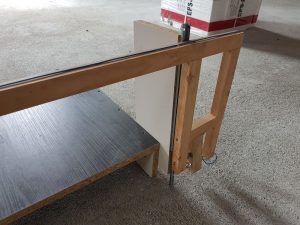
Mounting the wooden frame holder
Screw it again: we have to screw the two 35 cm x 15 cm (13,78″ x 3,94″) laminated board pieces to the to legs. These pieces have to be a 4 cm (1,6″) higher than the ground. They also have to overhung the front: about 3 cm (1,2″). On the pictures, I believe it can be seen what I’m trying to groan out. For this place, I made a folding mechanic, but it doesn’t make too much sense. If you want to cut in different angles, or fold the cutter so it can fit in smaller places, it can be useful. Note: I didn’t use the folding technique once. So I advise to screw the holders squarely (at this point be precise, measure twice!). If you screw the holders at a bad angle, the cutter will cut in the same bad angle!
Building the wooden frame
This frame holds the hot wire that cuts the polystyrene. It van be moved up-and down, and it connects to the frame holder with the roller slides.
Cut (saw, jigsaw, buzz saw – doesn’t matter, just cut it) the wood slat into these sized pieces: 1 piece 157 cm (61,81″) long, 2 pieces 31 cm (12,2″) long, 2 pieces 28 cm (11,02″) long. you will also need 3 little pieces that will stiffen the wooden frame. The larger pieces goes to the side of the long piece, and the short pieces have to go to the inner side. The two short piece has to meet with the wooden frame holder! you have to stiffen the short and the long pieces together with some small wood… The main point is to let the metal cutting wire through the long pieces (31 cm), and under the short pieces (28 cm). you can see the plan on the picture.
Hot wire stretcher

Meanwhile we are using the Styrofoam, the machine is heating the metal wire. The heated wire unfortunately stretches, the flea should bite the physics of that. Because of this unfortunate phenomenon, we have to make a sprung stretcher which keeps the cutting wire tight. If we forget this piece, the wire gets longer after turning the machine on, and starts to swing like an old mans scr0tum on the nudist beach. To make this piece, we have to use a spring, a piano hinge and a small piece of wood. You can arrange them like you can see it on the picture: with the hinge you can let the piece of wood swing. The spring always flexes the metal, so it can stretch, it will stay tight. It’s worth to put a metal screw in to the spring, that keeps the spring in place. We have to drill a hole in the swinging wooden piece, the ring bolt goes through there. The wingnut goes on the ring bolt. We will drive the current into this ring bolt. The ring bolt drives the juice into the metal cutting wire. And the power will heat up the cutting wire.
Ring bolts
As mentioned, one of the ring bolts goes through the flexing piece of wood. The other ring bolt goes through the 31 cm (12,2″) piece, on the other side of the frame (on the outside). So you have to drill a hole on this piece of wood as well, and put the ring bolts in it. The ring have to look towards each other! After this, you can knot the metal EPS cutting wire to the bolts tightly. This way you’ll have a tight, almost level polystyrene cutter metal wire.
EPS cutter wire
This wire has to be a brand one. Despite It’s expensive, you have to buy an original, expensive one. Weak wires can’t take the big heat load, and fall apart after a few use. The original wires are made of some kind of alloy with nickel and other kinds of metal (who knows what), and can easily withstand the force and the heat load. Don’t save money on this item, because you will go mad of the wire replacing. An original wire will be enough for the whole house building.
Fix the wooden frame to the holder!

We have to use our roller slides for this episode! With a clever way, these roller slides will keep the frame in good direction while we are cutting the insulation. These roller slides have to be fitted in an opened way, with screws. If the wooden frame in pulled up, the EPS insulation sheet (mine is 15 cm thick) has to fit under the cutting wire. If you close the frame down, the wire has to be under the work deck. This way the wire will cut through all the insulation. I gave the roller slides some WD-40 (greasing oil) because I found some happiness in it.
Electrical wiring
The last step is fixing the electric wires. It’s not a complicated job, but if you’re not sure of yourself, ask one electrician friend to do the job. It will take 5 minutes max. One thing is for sure: don’t poke the notebook charger, it has 220 V (110 V U.S.) in it. The thin wire that comes out of the charger has only 24 V inside, you can touch that one. Anyway, if you kill yourself with electricity, I wasn’t here, We don’t know each other, I’m not even here. I don’t take responsibility for anything at all.
The trick is: if you connect the charger to the wall socket, it will make 15-24 V from the 220 V (110 V U.S.). You’ll have to take this 24 V to the two ringed bolts. To make this, you’ll have to divide the thin cable into two. (it has two thinner cables in it). You can use the universal DC connector to do this. The way of the current is unimportant, the only important thing is to lead one wire to one ringed bolt.
Notebook charger adapter

The type of notebook adapter is on the picture. This is a noname product, but You can’t loose, if you choose a similar one. I made a few shots, so you can see it better. There is also an USB port on it. I wouldn’t attach it to my smartphone even for Claudia Schiffer’s virginity… Netfilx is not working on it, the next model will have that.
The voltage can be changed on it, from 15 V to 24 V. The higher the voltage, the hotter the wire. The hotter wire cuts faster, but falls apart faster. I of course always used 24 V, because I’m in a hurry even if I’m not in a hurry. The machine easily cuts through EPS, XPS, polystyrene, and all kinds of foamed heat insulation types.
Unfortunately there is no on/off button on it, so I used an extension cord with such a button. Oh, yeah: if you don’t use the machine, turn it off! It’s weakening the cutter wire, and it’s also flammable. And you can burn yourself with it, just like me (the whole country heard the swear-tsunami).
Luckily, the seller gave an universal plug, so you can attach it to the universal DC plug.
Arranging the cords
Pin the thin copper cords to the frame. It’s that easy. Once more: one copper cable goes to one ringed bolt. The other cable goes to the other ringed bolt. You can attach the wires to the bolts with the wingnuts and washers. The wires other ends are going to the universal DC plug.

And you are finished, try the machine, and start bragging about your awesomeness!
How to use the EPS cutter?
Simple as a smack in the face: give some power to it, pull the frame up, so the insulation block can fit under the heated wire. Then put the wire on the EPS block. Let the frame go: the frame will go down by it’s own weight, and will cut the block vertically. Catch the falling pieces before they fall back on to the wire. And don’t touch, lick, cuddle the hot wire, because it will tattoo your bacon.
End of the line
If you are not as clumsy as me, you can put the machine together in one day. In exchange, you’ll have a neat little EPS cutter, that will serve your whole house building. After building the house, you can sell it, and receive the money back. I gifted it to my insulation team… They wanted to modify it with a better work desk.
If you made it, send me a beer!
The article can be found in beautiful Hungarian language as wel.
Written by: Levi

